wire/net
wire drawing
There are three modes to enter wire drawing mode.
In a schematic, you can draw lines in any direction. Modify line style, color, fill color, etc.
Top shortcut bar - Wire
Top Menu - Place - Wire
Shortcut key W

Drawing wire the undetermined segments are translucent to distinguish determined segments.
The figure below is a schematic diagram that has been wired up.

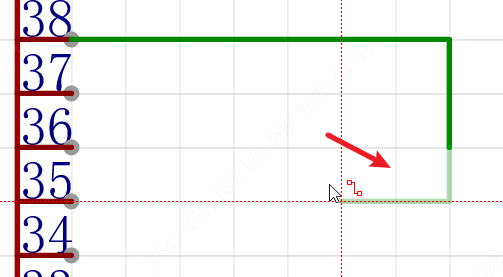
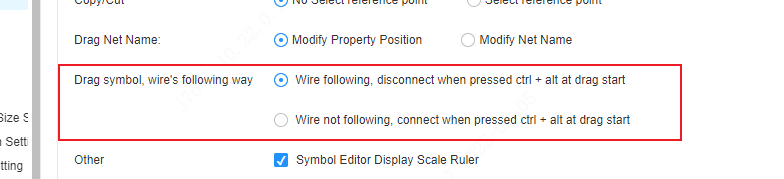
When moving the component, whether the wire follows the support setting item setting:
Wire properties
EasyEDA Pro supports the function of placing net labels. The net label function of the professional version is the same as setting the property name for the wire directly, which is different from the net label of the standard version.

Property description:
- Name: The name of the wire, which is generated according to this property when generating the network name. When the default name is not filled in, the editor will automatically generate a system default network name according to the wire ID.
- Global Net Name: Because the schematic supports hierarchical diagram design. The wire name and global net name of the underlying schematic may not be the same. The global net name is the net name used when going to the PCB.
Wire modification name support:
Directly double-click the wire name to modify
Click on the wire and modify the name in the properties panel on the right
Notice:
EasyEDA Pro no longer supports multiple network names on one wire at the same time. If you need to connect different networks together, please use a short-circuit character to short-circuit the two networks.
To add a dash to the wire name, enter a tilde at the top of the wire's net name, such as
~VSS. If you need to have a network name with an upper dash and no upper dash at the same time, enter a tilde again, for example:~VSS~/GND, then there is an upper dash above VSS, but not after the slash. When the net name is transferred to the PCB, it will also be~VSS~/GND.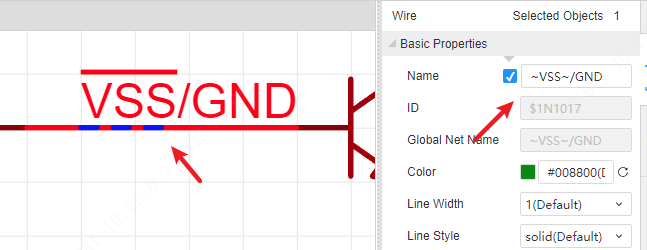
When a wire is connected to a net ID, the wire name will follow the name of the net ID first.
When wires are split or merged, a pop-up window will appear to select the net assignment after the operation.
Wire pick selected
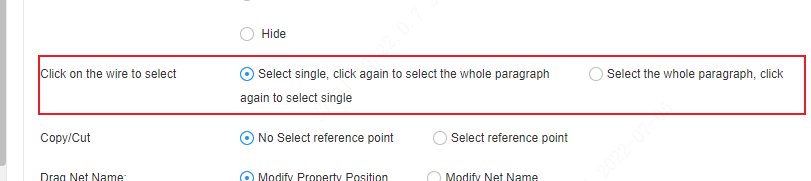
EasyEDA Pro supports two wire picking methods:
By default, click to pick a complete wire segment, and click again to pick a single segment of wire; or click to select a single segment, and click again to pick a complete wire.
This picking method supports modification in Settings - Schematic Settings.
When you click to select a single line segment, you can press the TAB key to select the complete wire.
Wire right-click menu
In the schematic design, the right-click menu of the wire is provided, which supports multiple functions to facilitate design and inspection.
After selecting the wire, you need to right-click on the wire to display the right-click menu of the wire.
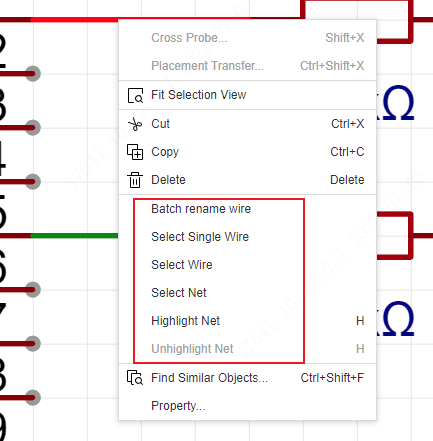
Menu Description:
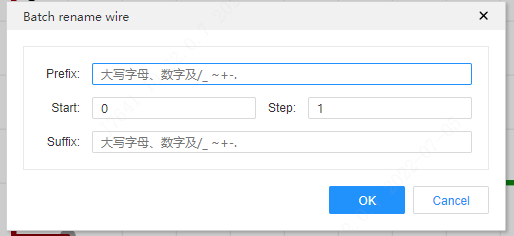
Bulk renaming of wires: supports renaming after multiple selection of different wires.
Select single-segment wire: When the selected wire is an entire wire, this menu supports the selection of a single-segment wire.
Select Wire: When a single wire segment is selected, this menu supports selection of a complete wire.
Select Network: Select the current wire of the current drawing page and all wires of the network to which it belongs.
Highlight Net: All wires with the same net of the current wire are continuously highlighted. The network tab on the left also supports right-clicking the network name to highlight the network.
De-Highlight Nets: Deactivates all highlighted wires.