Library FAQs
How to create device libraries in batches
Details
EasyEDA can create device libraries in batches in two ways
You can extract the library when importing the library of a third-party EDA, and then you can create in batches
Create in batches by using xlsx tables. For details, see the tutorial: Batch create devices
How to create a library file
Details
1、In the editor home page, click New Device.
2, device binding symbol and footprint, if there is no symbol and footprint, you need to create a new one first.
3、After the completion of New, in the bottom panel (shortcut key S), or in the device Place dialog box (shortcut key SHIFT+F) to find the device list, select the device to place in the schematic.
How EasyEDA's component libraries are differentiated
Details
EasyEDA Pro's libraries are divided into: device library, symbol library, footprint library, and reuse block library. Device = Symbol + footprint + 3D model + Properties. It is possible to reuse symbols, footprints, 3D libraries, etc. very well. New devices need to be associated with symbols footprints, etc.
Only support placing device in schematic or PCB, when the device is placed in schematic, it will take symbol with it and instantiated as component at this time. The device on the canvas is a component.
How to delete library files in offline mode?
Details
If you need to remove one of the components separately, you can select the component and click the right mouse button to delete it.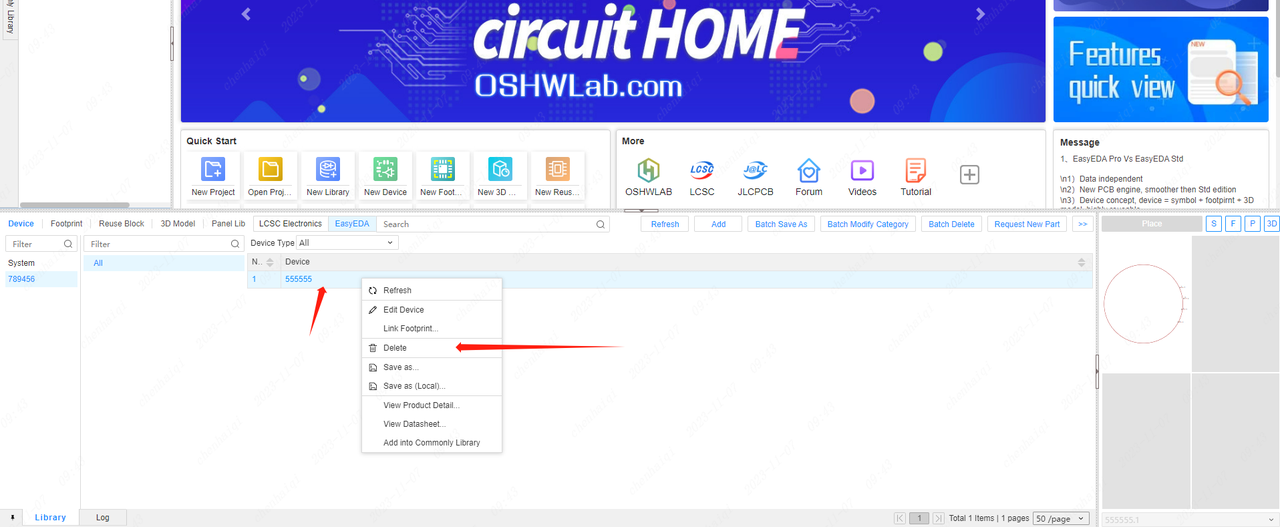
If you need to delete the entire library, first select the library and right-click it.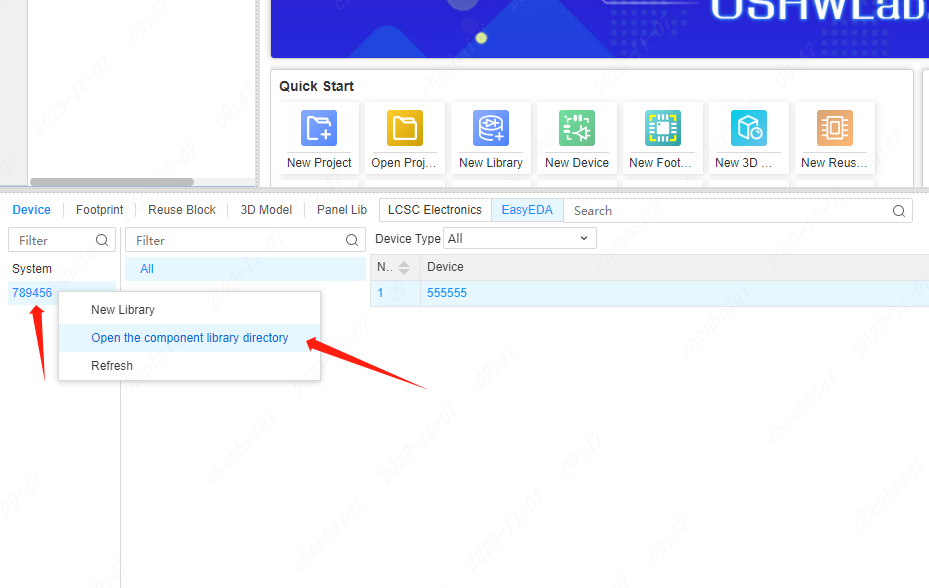
Then remember the location of this file, close the entire editor and then go to my computer to search for this folder and delete it. Finally, when you reopen your editor, the library will disappear.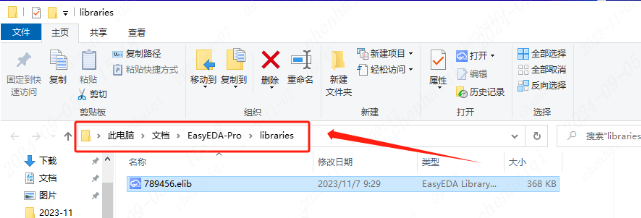
Why can I export to BOM file even though it has been set to ‘No’ in the properties of the device?
Details
Open the export BOM interface, you need to click Restore default or manually set, set the filtering rules.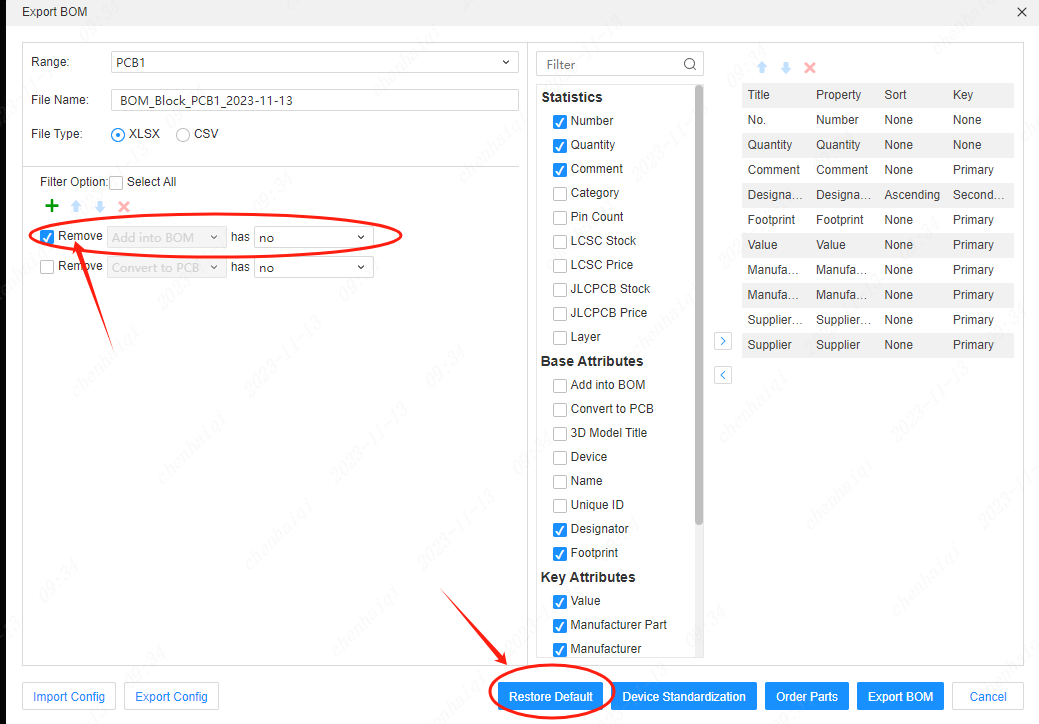
How does a personal library import a team library?
Details
Step 1: Enter your personal workspace. Step 2: Select components and choose which team to transfer to.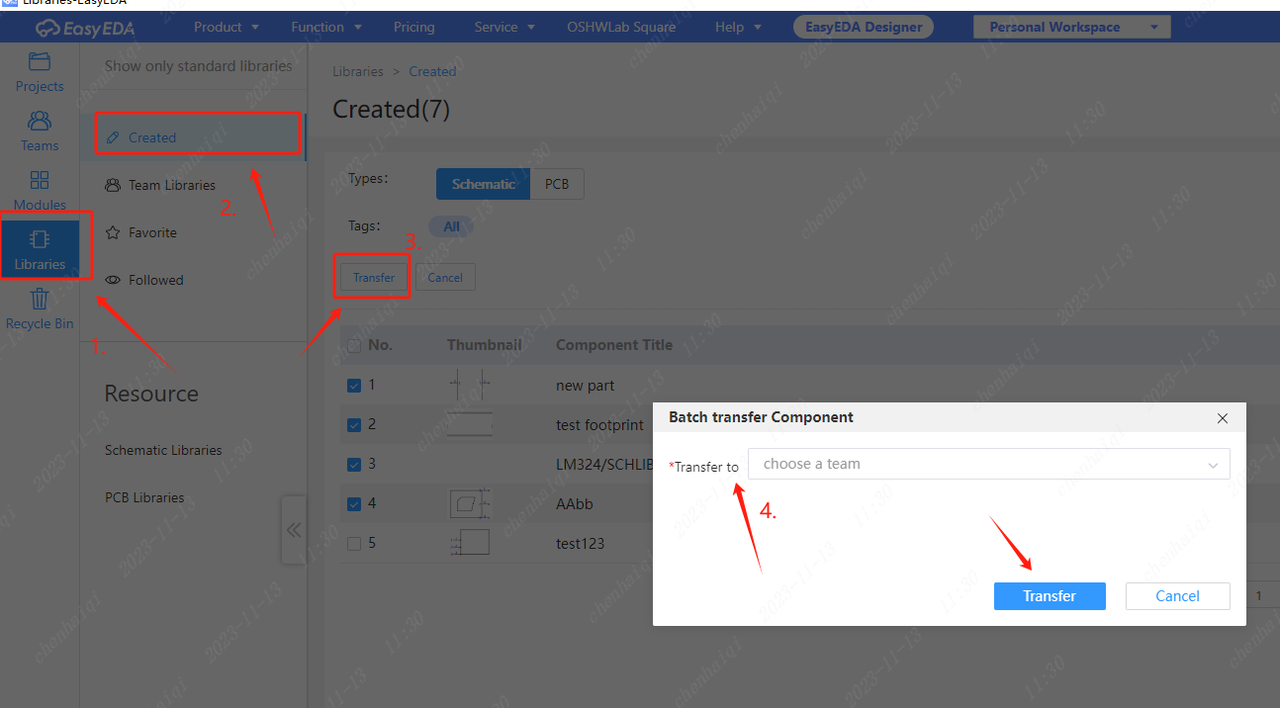
Step 3: Refresh the screen to see it in the team library.
How to open elib offline library?
Details
First, you need to go into offline mode. Second, find the "Library" in the bottom panel, select the "system", click the right mouse button to select "Open the component Library directory".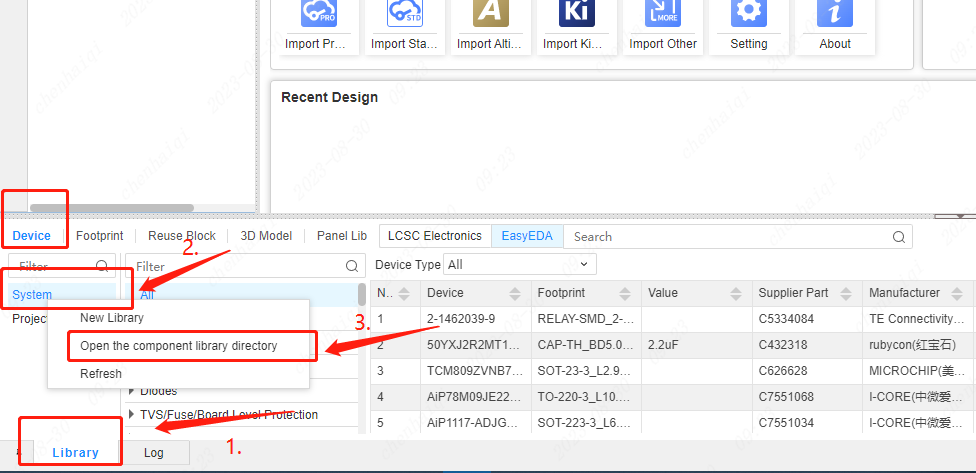
Then put the eilb library file in your local library directory path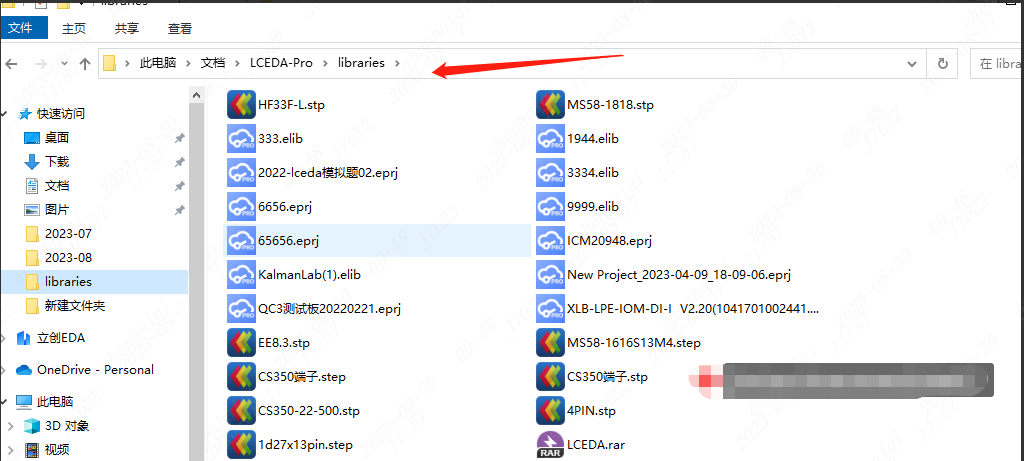
Finally, go back to your library, hit the Refresh button, and there you are.
How to use device standardization?
Details
There are three classifications at the top of device standardization:Undetermined, Allocation number These two classifications are components that need to be processed. Exact Match are components that are perfectly matched and do not need to be processed. The function of Assign LCSC Part means to select the device you want inside the LCSC according to your needs.
How to save a footprint library with an open project file as a personal library?
Details
Inside the opened project, find the Library panel at the bottom, select Project Library, then select the desired components, click the right mouse button and select Save As.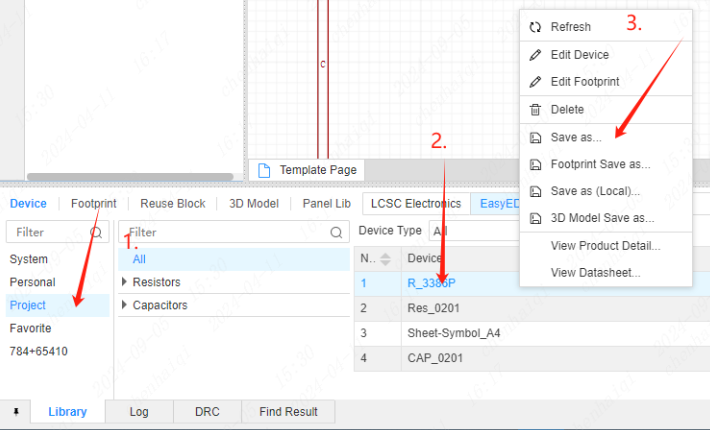
Then just store it in your personal library.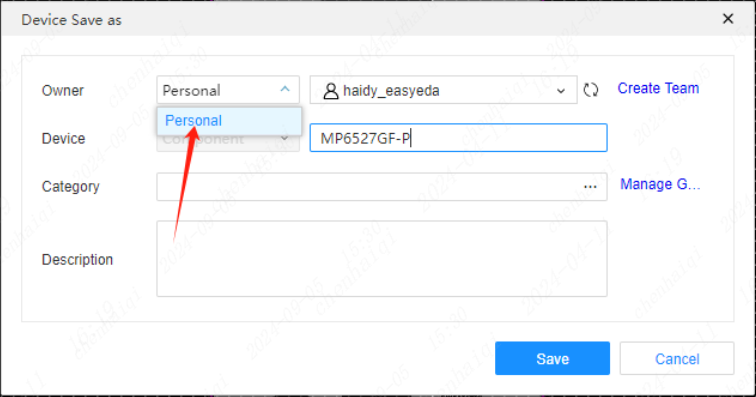
How to create a multi-part component?
Details
When there are too many pins in a component, drawing it all in one library file would be very space consuming, so it is possible to multi-symbolise the component by creating sub-libraries (also known as multi-part devices, sub-master libraries, multi-part symbols, etc.). All sub-libraries together are a complete component. Each sub-library corresponds to the same package, only the corresponding pad numbers are different. Step 1: Start with a new symbol.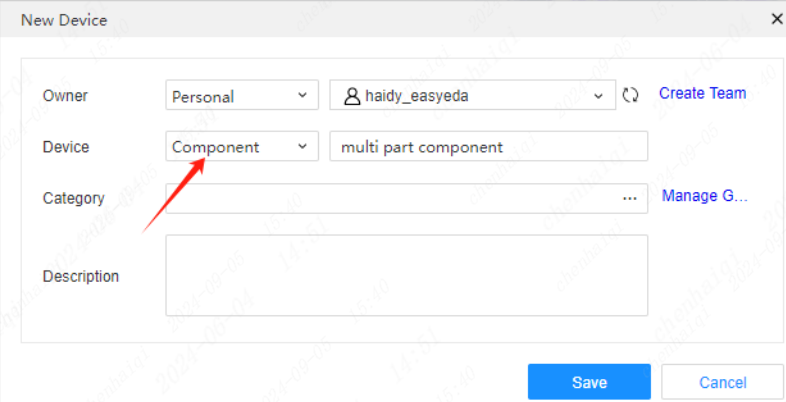
Step 2: Draw the first part first.Then click the ‘part’ button on the left to enter the creation of multiple parts. Step 3: Click the plus sign to create a second or more part schematics.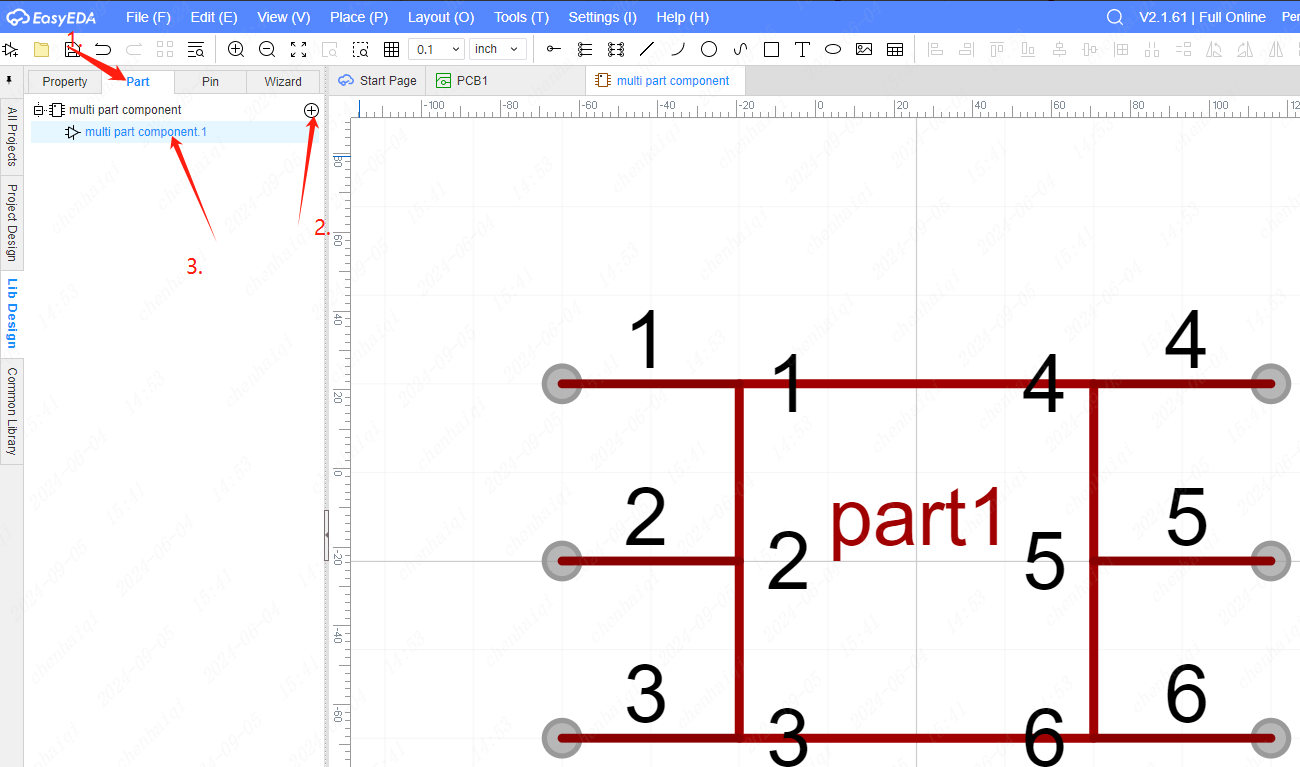
Step 4: Click on the widget to edit the part you want to edit. Step 5: Once you have finished drawing all the multiple parts, click Save. Step 6: Finally, find the personal library in the bottom panel, place the parts on the schematic and you are done.
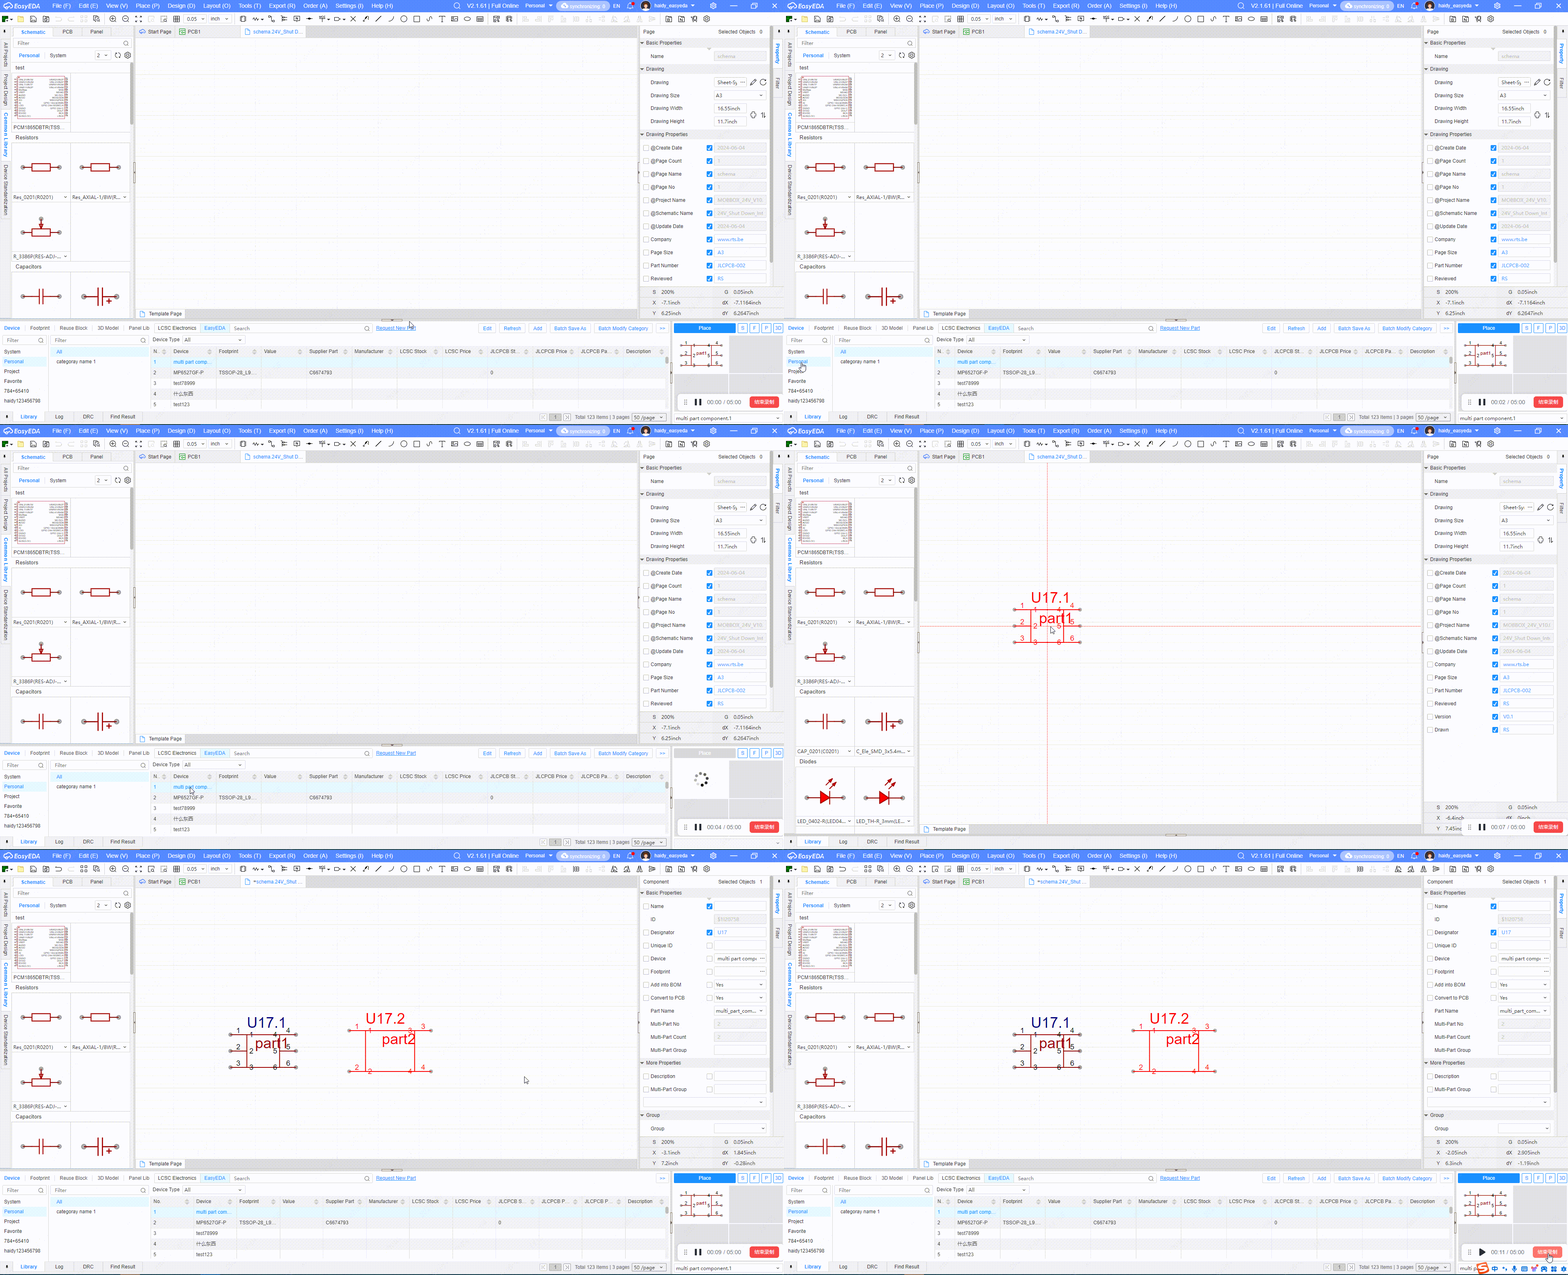
Note: Each time you add a sub-library, it will generate a part file with the name of 1, 2 or 3. Multi-part components only need to specify only one footprint, if you specify a different footprint for each sub-library, then EasyEDA will keep the last specified package as the component's package.
How to open the bottom panel library tool?
Details
First way: click on the Library panel in the bottom left corner to open it. 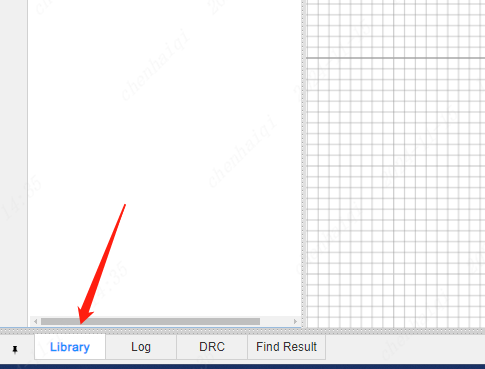
Second way: if you need to fix it, click on the VIEW tool in the neck menu bar to tick it. 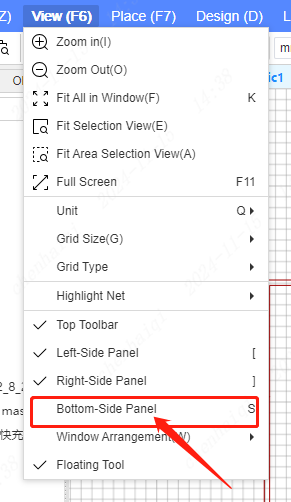
Third way: Press the shortcut key ‘S’ to open the panel.
How to search and place devices?
Details
You can find the library tool in the top menu bar, or press the shortcut ‘shift + F’, or you can use the bottom panel library. 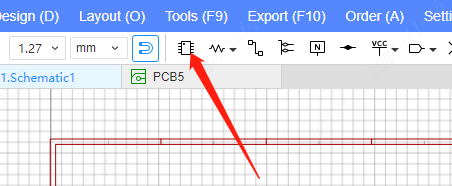
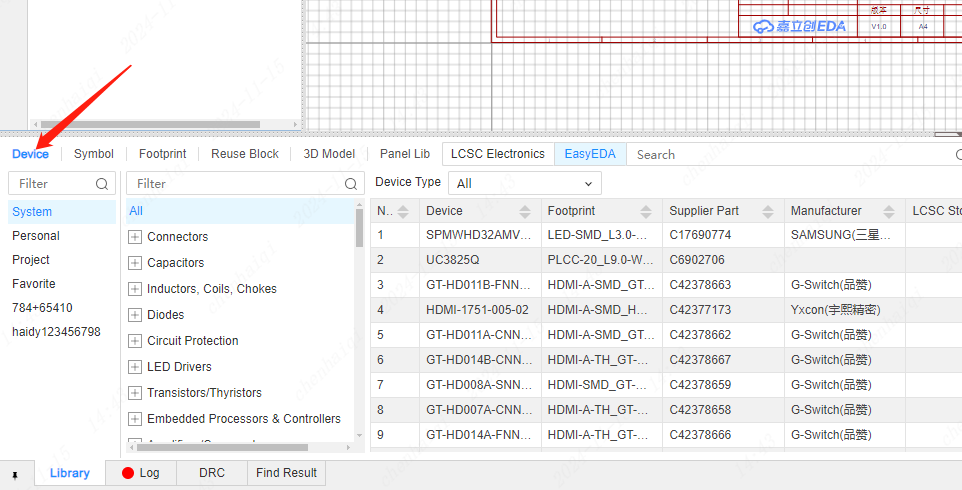
How to check the size of the footprint?
Details
In the top menu bar, open the Footprint Manager, select the device you want to view and click Check Pad Dimension. 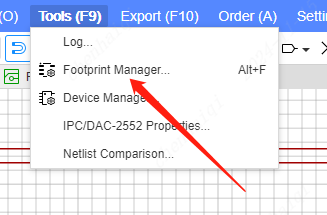
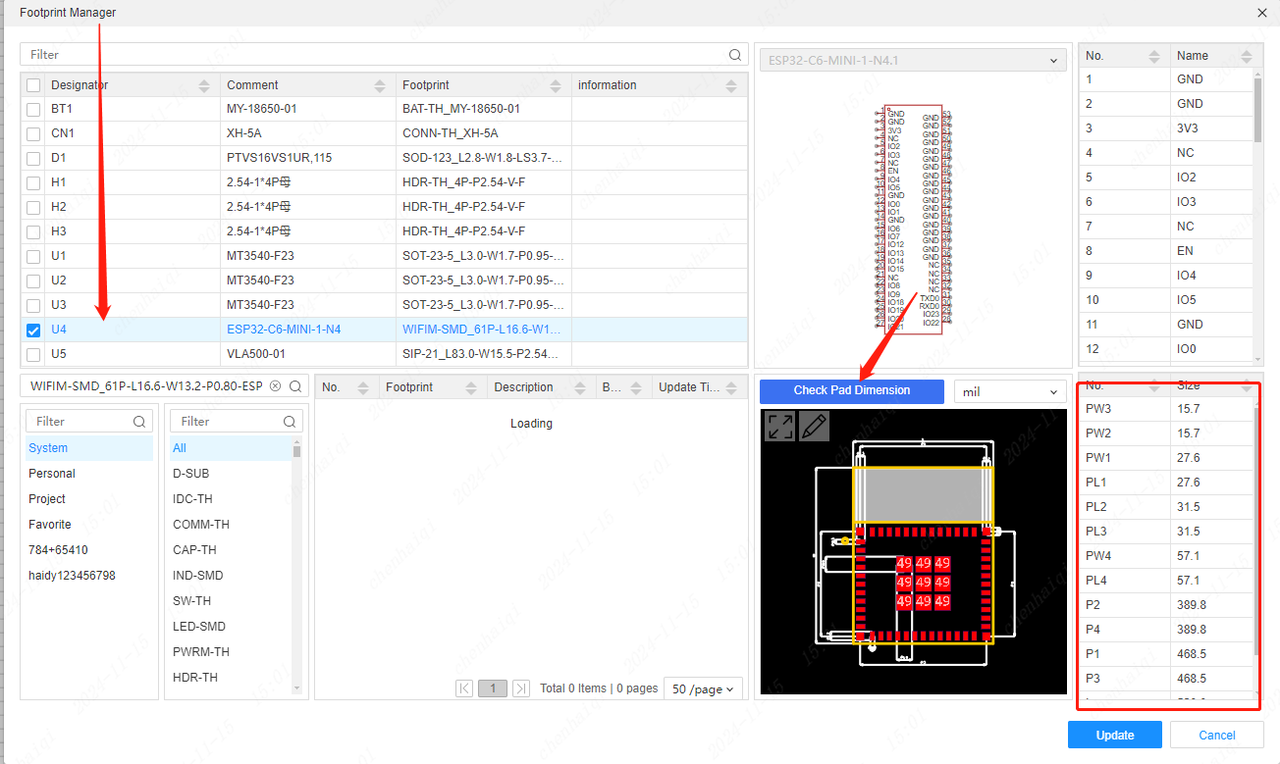
Second method: With footprint selected, click the right mouse button and select Edit footprint.Find Tools in the top menu bar. 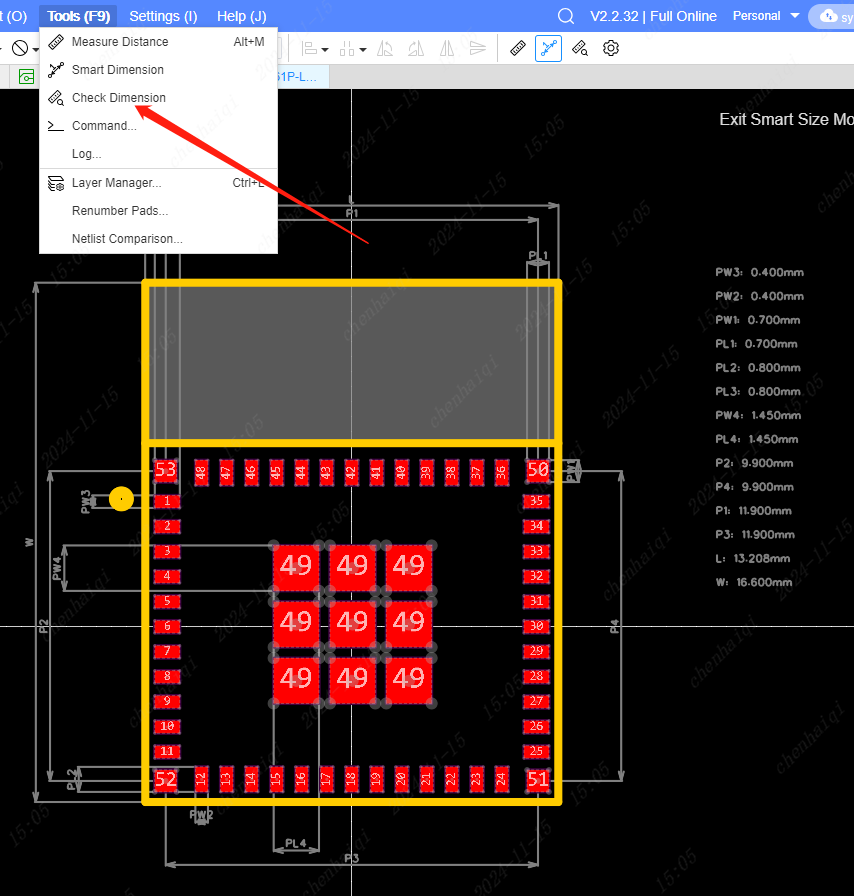
How to export library files?
Details
Open the Library tool in the bottom panel, select the device you want to save, and then click the right mouse button to save as a local library file. You can also do this in batch. 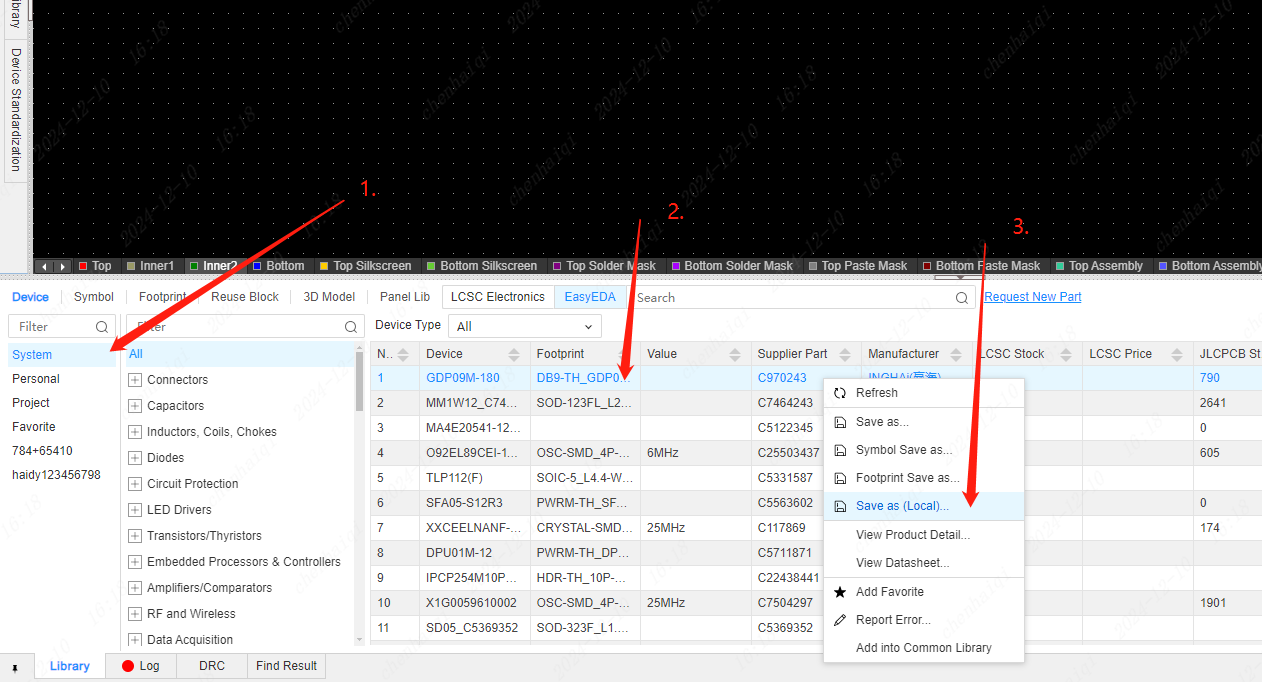

How to open the Search Library tool?
Details
First method: click on the Library Tools icon in the top menu bar. 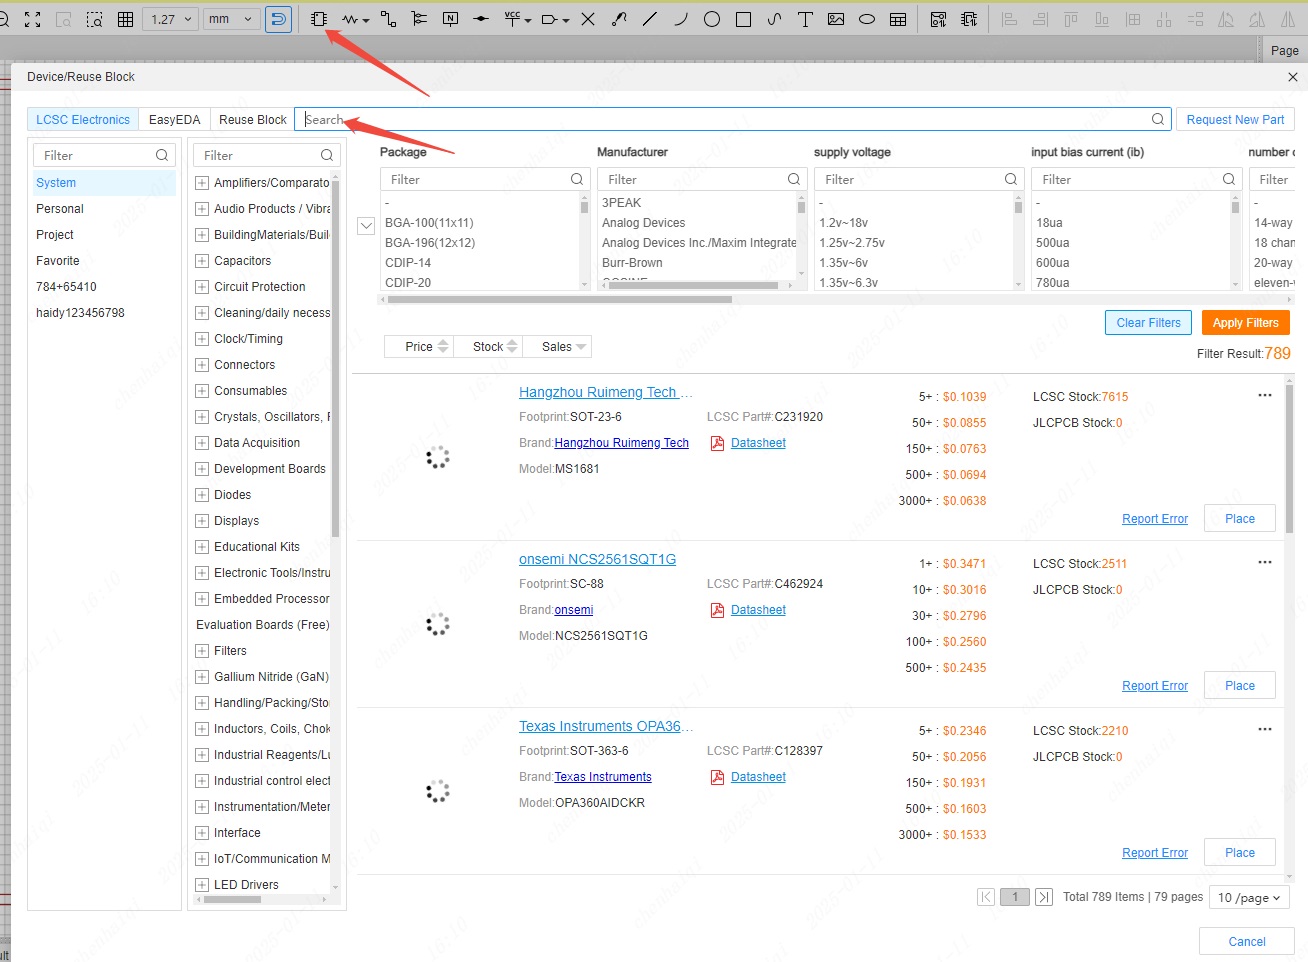
Second method: click on the Library Tools icon in the bottom panel. 